DockerFile DockerFile 介绍
dockerfile 是用来构建docker镜像的文件!命令参数脚本!
构建步骤:
编写一个 dockerfile 文件
docker build 构建成为一个镜像
docker run 运行镜像
docker push 发布镜像 ( DockerHub、阿里云镜像仓库!)
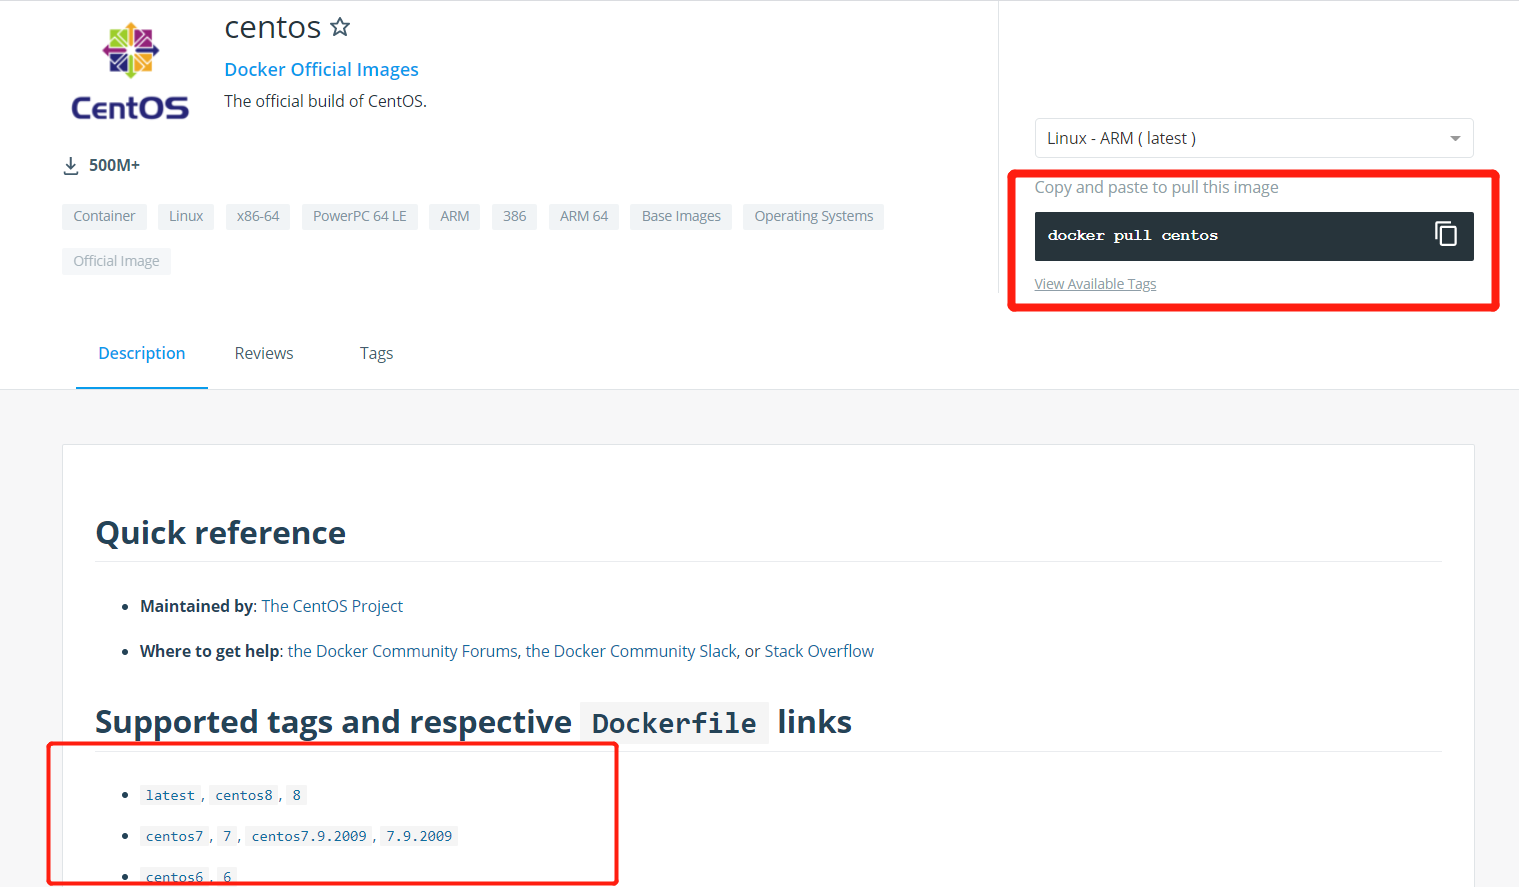
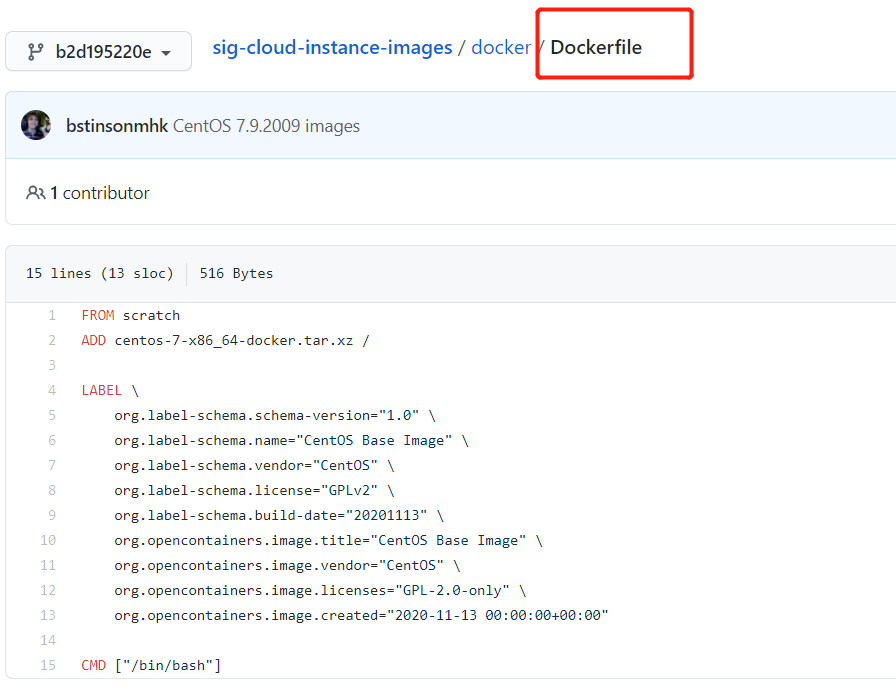
查看官方操作?
很多官方镜像都是基础包,很多功能没有,我们通常会自己搭建自己的镜像!
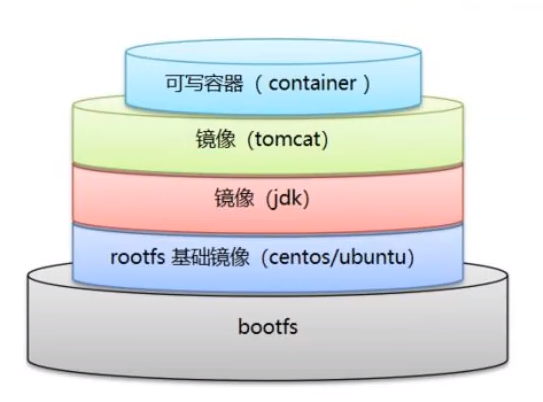
DockerFile 构建过程 基础知识 :
每个保留关键字(指令)都是必须大写字母
执行从上到下顺序执行
# 表示注释
每一个指令都会创建提交一个镜像层,并提交!
dockerfile是面向开发的,以后发布项目,做镜像,就需要编写dockerfile文件,这个文件十分简单!
DockerFile : 构建文件,定义了一切的步骤,源代码
DockerImages : 通过DockerFile 构建生成的镜像,最终发布和运行的产品!
Docker容器:容器就是镜像运行起来提供服务器
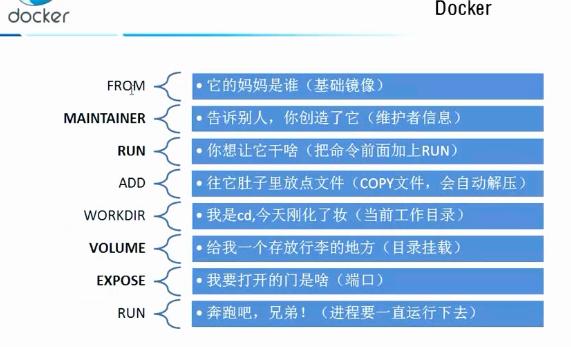
DockerFile 的指令 1 2 3 4 5 6 7 8 9 10 11 12 FROM # 基础镜像,一切从这里开始构建 MAINTAINER # 镜像谁写的,姓名+邮箱 RUN # 镜像构建的时候需要运行的命令 ADD # 步骤,tomcat镜像。tomcat压缩包。添加内容 WORKDIR # 镜像的工作目录 VOLUME # 挂载的目录位置 EXPOSE # 暴露端口 CMD # 指定这个容器启动的时候要运行的命令,只有最后一个会生效,可被替代 ENTRYPOINT # 指定这个容器启动的时候要运行的命令,可以追加命令 ONBUILD # 当构建一个被继承 DockerFile 这个时候就会运行 ONBUILD 的指令。触发指令。 COPY # 类似ADD,将我们文件拷贝到镜像中 ENV # 构建的时候设置环境变量
实战测试 Docker Hub 中 99% 镜像都是从这个基础镜像过来的 FROM scratch ,然后进行配置以及软件来进行构建。
制作一个自己centos镜像 1 2 3 4 5 6 7 8 9 10 11 12 13 14 15 16 17 18 19 20 21 22 23 24 25 26 27 # 编写dockerfile [root@baohua dockerfile]# cat mydockerfile FROM centos MAINTAINER baohua<136163022@qq.com> ENV MYPATH /usr/local WORKDIR $MYPATH RUN yum -y install vim RUN yum -y install net-tools EXPOSE 80 CMD echo $MYPATH CMD echo "---end---end" CMD /bin/bash # 构建镜像 [root@baohua dockerfile]# docker build -f mydockerfile -t mycentos:0.1 # 通过文件构建镜像 # 命令 docker build -f dockerfile文件路径 -t 镜像名:[tag] # 测试运行 Successfully built 79cedcf5e693 Successfully tagged mycentos:0.1
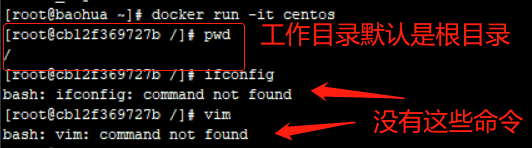
对比: 原生的centos
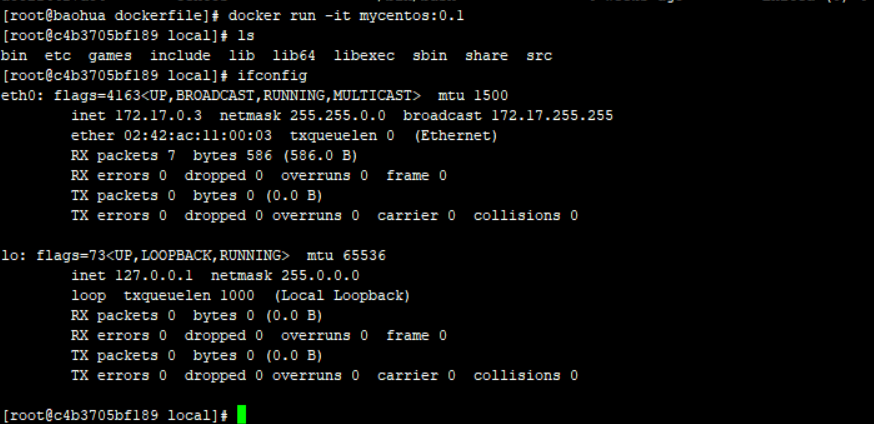
增加之后的centos ,默认进入/usr/local ,有命令了!!!
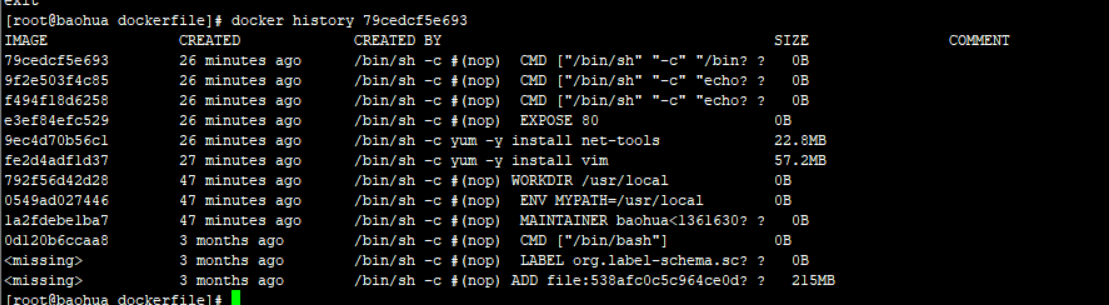
可以通过 docker history 容器id 列出变更历史
CMD 和 ENTRYPOINT 的区别 1 2 CMD # 指定这个容器启动的时候要运行的命令,只有最后一个会生效,可被替代 ENTRYPOINT # 指定这个容器启动的时候要运行的命令,可以追加命令
1 2 3 4 5 6 7 8 9 10 11 12 13 14 15 16 17 18 19 20 21 22 23 24 25 26 27 28 29 30 31 32 33 34 35 36 37 38 39 40 41 42 43 44 45 46 47 48 # 编写 dockerfile 文件 [root@baohua dockerfile]# vim dockerfile-cmd [root@baohua dockerfile]# cat dockerfile-cmd FROM centos CMD ["ls","-a"] # 构建镜像 [root@baohua dockerfile]# docker build -f dockerfile-cmd -t cmdtest . Sending build context to Docker daemon 3.072kB Step 1/2 : FROM centos ---> 0d120b6ccaa8 Step 2/2 : CMD ["ls","-a"] ---> Running in cadeb9574fc7 Removing intermediate container cadeb9574fc7 ---> e4545de53e54 Successfully built e4545de53e54 Successfully tagged cmdtest:latest # run 运行,发现ls -a命令生效 [root@baohua dockerfile]# docker run e4545de53e54 . .. .dockerenv bin dev etc home lib lib64 lost+found media mnt opt proc root run sbin srv sys tmp usr var # 想追加一个命令 -l ls -al # [root@baohua dockerfile] docker: Error response from daemon: OCI runtime create failed: container_linux.go:349: starting container process caused "exec: \"-l\": executable file not found in $PATH": unknown. # cmd的清理下 -l 替换了CMD ["ls" ,"-a" ] 命令,-l 不是命令所以报错
1 2 3 4 5 6 7 8 9 10 11 12 13 14 15 16 17 18 19 20 21 22 23 24 25 26 27 28 29 30 31 32 33 34 35 36 37 38 39 40 41 42 43 44 45 46 47 48 49 50 51 52 53 54 55 56 57 58 59 60 61 62 [root@baohua dockerfile]# cat dockerfile-entrypoint FROM centos ENTRYPOINT ["ls","-a"] [root@baohua dockerfile]# docker build -f dockerfile-entrypoint -t entryponittest . Sending build context to Docker daemon 4.096kB Step 1/2 : FROM centos ---> 0d120b6ccaa8 Step 2/2 : ENTRYPOINT ["ls","-a"] ---> Running in f5e11aca5a6f Removing intermediate container f5e11aca5a6f ---> 309af04008f6 Successfully built 309af04008f6 Successfully tagged entryponittest:latest [root@baohua dockerfile]# docker run 309af04008f6 . .. .dockerenv bin dev etc home lib lib64 lost+found media mnt opt proc root run sbin srv sys tmp usr var # 追加命令,是直接拼接 ENTRYPOINT 的后面的 [root@baohua dockerfile]# docker run 309af04008f6 -l total 56 drwxr-xr-x 1 root root 4096 Nov 22 10:23 . drwxr-xr-x 1 root root 4096 Nov 22 10:23 .. -rwxr-xr-x 1 root root 0 Nov 22 10:23 .dockerenv lrwxrwxrwx 1 root root 7 May 11 2019 bin -> usr/bin drwxr-xr-x 5 root root 340 Nov 22 10:23 dev drwxr-xr-x 1 root root 4096 Nov 22 10:23 etc drwxr-xr-x 2 root root 4096 May 11 2019 home lrwxrwxrwx 1 root root 7 May 11 2019 lib -> usr/lib lrwxrwxrwx 1 root root 9 May 11 2019 lib64 -> usr/lib64 drwx------ 2 root root 4096 Aug 9 21:40 lost+found drwxr-xr-x 2 root root 4096 May 11 2019 media drwxr-xr-x 2 root root 4096 May 11 2019 mnt drwxr-xr-x 2 root root 4096 May 11 2019 opt dr-xr-xr-x 97 root root 0 Nov 22 10:23 proc dr-xr-x--- 2 root root 4096 Aug 9 21:40 root drwxr-xr-x 11 root root 4096 Aug 9 21:40 run lrwxrwxrwx 1 root root 8 May 11 2019 sbin -> usr/sbin drwxr-xr-x 2 root root 4096 May 11 2019 srv dr-xr-xr-x 13 root root 0 Nov 21 07:19 sys drwxrwxrwt 7 root root 4096 Aug 9 21:40 tmp drwxr-xr-x 12 root root 4096 Aug 9 21:40 usr drwxr-xr-x 20 root root 4096 Aug 9 21:40 var
对比+测试得出结论!!!
Tomcat 镜像
准备镜像文件 tomcat 压缩包,jdk的压缩包!
编写dockerfile文件,官方命名Dockerfile , build 会自动寻找这个文件,就不需要 -f 指定了!
1 2 3 4 5 6 7 8 9 10 11 12 13 14 15 16 17 18 19 20 21 22 23 FROM centos MAINTAINER baohua<136163022@qq.com> COPY readme.txt /usr/local/readme.txt ADD jdk-8u241-linux-x64.tar.gz /usr/local ADD apache-tomcat-8.5.51.tar.gz /usr/local RUN yum -y install vim ENV MYPATH /usr/local WORKDIR $MYPATH ENV JAVA_HOME /usr/local/jdk1.8.0_241 ENV CLASSPATH $JAVA_HOME/lib/dt.jar:$JAVA_HOME/lib/tools.jar ENV CATALINA_HOME /usr/local/apache-tomcat-8.5.51 ENV CATALINA_BASH /usr/local/apache-tomcat-8.5.51 ENV PATH $PATH:$JAVA_HOME/bin:$CATALINA_HOME/bin:$CATALINA_HOME:/lib EXPOSE 8080 CMD /usr/local/apache-tomcat-8.5.51/bin/startup.sh && tail -F /usr/local/apache-tomcat-8.5.51/bin/logs/catalina.out
构建镜像
1 2 3 4 5 6 7 # docker build -t diytomcat . # 查看构建的镜像 [root@baohua tomcat]# docker images REPOSITORY TAG IMAGE ID CREATED SIZE diytomcat 0.1 d0684f97ba66 2 days ago 691MB
启动测试
1 docker run -d -p 8080:8080 --name baohuatomcat -v /home/baohua/build/tomcat/webapps/test:/usr/local/apache-tomcat-8.5.51/webapps/test -v /home/baohua/build/tomcat/apache-tomcat-8.5.51/logs:/usr/local/apache-tomcat-8.5.51/logs diytomcat:0.1
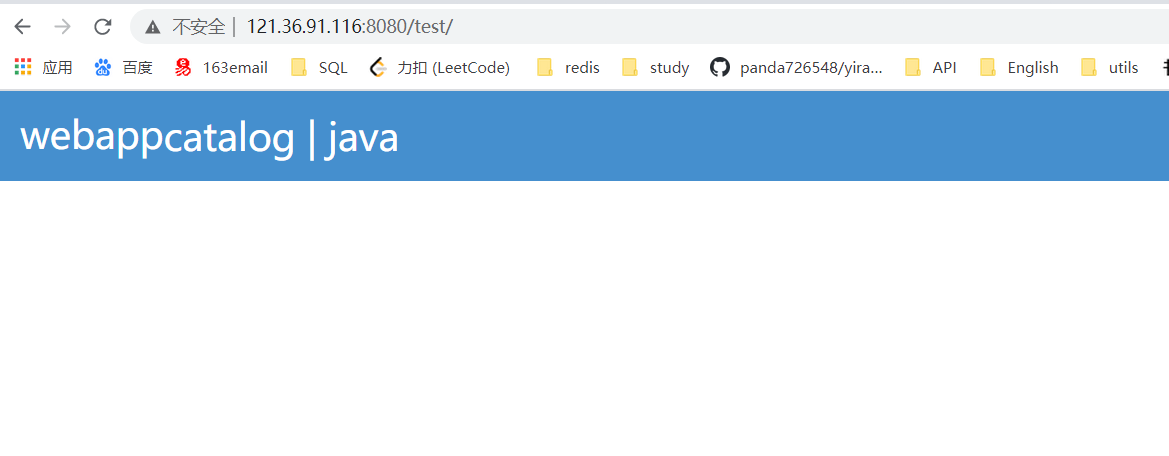
访问测试
发布项目( 由于做了卷挂载,直接在本地编写项目就可以发布了)
web.xml
1 2 3 4 5 6 7 <?xml version="1.0" encoding="UTF-8"?> <web-app xmlns:xsi ="http://www.w3.org/2001/XMLSchema-instance" xmlns ="http://java.sun.com/xml/ns/javaee" xsi:schemaLocation ="http://java.sun.com/xml/ns/javaee http://java.sun.com/xml/ns/javaee/web-app_2_5.xsd " version ="2.5" > </web-app >
index.jsp
1 2 3 4 5 6 7 8 9 10 11 12 13 14 15 16 17 18 19 20 21 22 23 24 25 26 27 28 29 30 31 32 33 34 35 36 37 38 39 40 41 42 43 44 45 46 47 48 49 50 51 52 53 54 55 <%@ page language="java" contentType="text/html; charset=utf-8" pageEncoding="utf-8" %> <!DOCTYPE html PUBLIC "-//W3C//DTD HTML 4.01 Transitional//EN" "http://www.w3.org/TR/html4/loose.dtd" > <html> <head> <meta http-equiv="Content-Type" content="text/html; charset=utf-8" > <title>home</title> <style> *{ padding:0 ; margin:0 ; font-family:"微??潞?; } .header{ height:72px; background:#458fce ; } .header .logo{ color:#fff ; line-height:70px; font-size:30px; margin-left:20px; display:inline-block; text-align:center; } a { color: #fff ; text-decoration: none ; } .header .login{ float:right; color:#fff ; line-height:72px; margin-right:2px; display:inline-block; } .banner{ height:380px; overflow:hidden; background: #ddd; } </style> </head> <body> <div class=" header"> <div class=" logo">webapp <div class =" login"> <a href =" javascript:void (0 )">catalog</a> <span>|</span> <a href =" javascript:void (0 )">java<a> </div> </div> </body> </html>
==部署成功后,访问测试OK==
发布镜像
Docker Hub
https://hub.docker.com/ 注册自己的账号 (确保可以登录)在服务器上提交自己的镜像
1 2 3 4 5 6 7 8 9 10 11 12 13 14 15 16 17 18 19 20 21 [root@baohua /]# docker login --help Usage: docker login [OPTIONS] [SERVER] Log in to a Docker registry. If no server is specified, the default is defined by the daemon. Options: -p, --password string Password --password-stdin Take the password from stdin -u, --username string Username # 登录成功 [root@baohua /]# docker login -u baohua Password: WARNING! Your password will be stored unencrypted in /root/.docker/config.json. Configure a credential helper to remove this warning. See https://docs.docker.com/engine/reference/commandline/login/#credentials-store Login Succeeded
登录成功后就可以提交镜像了,docker push
1 2 3 4 5 6 7 8 9 10 11 12 13 14 15 16 17 18 19 20 21 22 23 24 25 26 27 28 # push 自己的镜像到服务器上 [root@baohua /]# docker push diytomcat The push refers to repository [docker.io/library/diytomcat] 2cb8e7d7b3ba: Preparing bad401b6e037: Preparing a7d865675a27: Preparing 73b5acd31424: Preparing 291f6e44771a: Preparing denied: requested access to the resource is denied # 拒绝 # 带上自己的信息以及TAG 版本号 [root@baohua /]# docker push baohua/diytomcat:0.1 The push refers to repository [docker.io/baohua/diytomcat] An image does not exist locally with the tag: baohua/diytomcat # 增加一个tag [root@baohua /]# docker tag d0684f97ba66 baohua/diytomcat:0.1 # push上去即可 [root@baohua /]# docker push baohua/diytomcat:0.1 The push refers to repository [docker.io/baohua/diytomcat] 2cb8e7d7b3ba: Pushing [> ] 1.107MB/57.23MB bad401b6e037: Pushing [====> ] 1.288MB/14.64MB a7d865675a27: Pushing [> ] 1.606MB/403.7MB 73b5acd31424: Pushed 291f6e44771a: Pushing [=> ] 5.462MB/215.1MB
也可发布至阿里云服务器