Spring 框架 一、Spring介绍
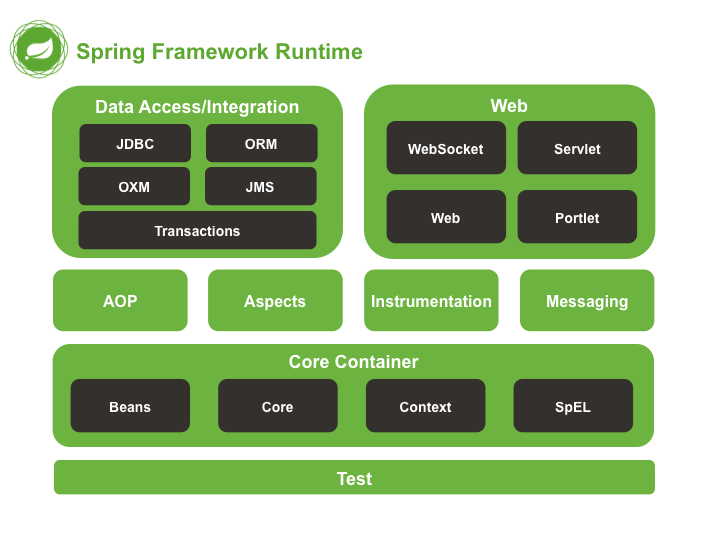
1.1 Spring 核心容器 (Core Container) 核心容器包括spring-core,spring-beans,spring-context,spring-context-support和springexpression(SpEL)等模块。
spring-core 和spring-beans 模块是Spring框架的基础,包括控制反转(依赖注入)等功能。 BeanFactory是工厂模式的复杂实现。可以把配置和依赖从实际编码逻辑中解耦。 spring-context 模块是在Core和Bean模块的基础上建立起来的,它以一种类似于JNDI注册的方式 访问对象。Context模块继承自Bean模块,并且添加了国际化、事件传播、资源加载等功能。 Context模块也支持Java EE的功能,比如EJB、JMX和远程调用等。spring-context-support提供了 对第三方库集成到Spring上下文的支持,比如缓存(EhCache, Guava, JCache)、邮件 (JavaMail)、调度(CommonJ, Quartz)、模板引擎(FreeMarker, JasperReports, Velocity) 等。 spring-expression 模块提供了强大的表达式语言用于在运行时查询和操作对象图。它是JSP2.1规 范中定义的统一表达式语言的扩展,支持set和get属性值、属性赋值、方法调用、访问数组集合及 索引的内容、逻辑算术运算、命名变量、通过名字从Spring IoC容器检索对象,还支持列表的投 影、选择以及聚合等。
1.2 AOP 和 Instrumentation
spring-aop 模块提供了面向切面编程(AOP)的实现,可以定义诸如方法拦截器和切入点等,从 而使横切的代码彻底的解耦出来。 - spring-aspects 模块提供了对AspectJ的集成。spring-instrument 模块通过agent保存了一个Instrumentation实例,目前主要用来实现AOP的 加载时植入。 spring-instrument-tomcat 模块是spring-instrument模块对应于tomcat的处理模块。
1.3 消息 Messaging Spring 4 包含的spring-messaging 模块是从Spring集成项目的关键抽象中提取出来的,这些项目包括 Message 、MessageChannel 、MessageHandler 和其它服务于消息处理的项目。这个模块也包含一 系列的注解用于映射消息到方法,这类似于Spring MVC基于编码模型的注解。
1.4 数据访问/集成 数据访问与集成层包含JDBC、ORM、OXM(Object XML Mapping)、JMS和事务模块。
spring-jdbc 模块提供了JDBC抽象层,它消除了冗长的JDBC编码和对数据库特定错误代码的解 析。spring-tx 模块支持编程式事务和声明式事务,可用于实现了特定接口的类和所有的POJO对象。 (编程式事务需要自己写beginTransaction()、commit()、rollback()等事务管理方法,声明式事务 是通过注解或配置由spring自动处理,编程式事务粒度更细) spring-orm 模块提供了对流行的ORM框架的集成,包括jpa、hibernate等。通过此模块可以让这 些ORM框架和spring的其它功能整合,比如前面提及的事务管理。 spring-oxm 模块提供了对OXM实现的支持,比如JAXB、Castor、XML Beans、JiBX、XStream 等。 spring-jms 模块包含生产(produce)和消费(consume)消息的功能。从Spring 4.1开始,集成了spring-messaging 模块。
1.5 Web Web层包括spring-web 、spring-webmvc 、spring-websocket 、spring-webmvc-portlet 等模 块。
spring-web 模块提供面向web的基本功能和面向web的应用上下文,比如文件上传功能、使用 Servlet监听器初始化IoC容器等。它还包括HTTP客户端以及Spring远程调用中与web相关的部 分。 spring-webmvc 模块(即Web-Servlet模块)为web应用提供了模型视图控制MVC和REST Web服 务的实现。Spring的MVC框架可以使领域模型代码和web表单完全地分离,且可以与Spring框架 的其它所有功能进行集成。 spring-webmvc-portlet 模块(即Web-Portlet模块)提供了用于Portlet环境的MVC实现,并反映了spring-webmvc 模块的功能。Spring5已经废弃改模块。
1.6 测试(Test) spring-test 模块通过JUnit和TestNG组件支持单元测试和集成测试。它提供了一致性地加载和缓存 Spring上下文,也提供了用于单独测试代码的模拟对象(mock object)。
二、Spring工程搭建 2.1 工程依赖 以下为Spring的pom:
1
2
3
4
5
6
7
8
9
10
11
12
13
14
15
16
17
18
19
20
21
22
23
24
25
26
27
28
29
30
31
32
33
34
35
36
37
38
39
40
41
42
43
44
45
46
47
48
49
50
51
52
53
54
55
56
57
58
59
60
61
62
63
64
65
66
67
68
69
70
71
72
73
74
75
76
77
78
79
80
81
82
83
84
85
86
87
88
89
90
91
92
93
94
95
<?xml version="1.0" encoding="UTF-8"?> <project xmlns ="http://maven.apache.org/POM/4.0.0" xmlns:xsi ="http://www.w3.org/2001/XMLSchema-instance" xsi:schemaLocation ="http://maven.apache.org/POM/4.0.0 http://maven.apache.org/xsd/maven-4.0.0.xsd" > <modelVersion > 4.0.0</modelVersion > <groupId > org.example</groupId > <artifactId > ssm-demo</artifactId > <version > 1.0-SNAPSHOT</version > <packaging > war</packaging > <name > ssm-demo Maven Webapp</name > <url > http://www.example.com</url > <properties > <project.build.sourceEncoding > UTF-8</project.build.sourceEncoding > <maven.compiler.source > 1.8</maven.compiler.source > <maven.compiler.target > 1.8</maven.compiler.target > <spring-version > 5.2.11.RELEASE</spring-version > <log4j2-version > 2.14.0</log4j2-version > <mysql-version > 8.0.22</mysql-version > </properties > <dependencies > <dependency > <groupId > org.springframework</groupId > <artifactId > spring-context</artifactId > <version > ${spring-version}</version > </dependency > <dependency > <groupId > org.springframework</groupId > <artifactId > spring-aop</artifactId > <version > ${spring-version}</version > </dependency > <dependency > <groupId > org.springframework</groupId > <artifactId > spring-aspects</artifactId > <version > ${spring-version}</version > </dependency > <dependency > <groupId > junit</groupId > <artifactId > junit</artifactId > <version > 4.11</version > <scope > test</scope > </dependency > <dependency > <groupId > org.apache.logging.log4j</groupId > <artifactId > log4j-jcl</artifactId > <version > ${log4j2-version}</version > </dependency > <dependency > <groupId > org.apache.logging.log4j</groupId > <artifactId > log4j-core</artifactId > <version > ${log4j2-version}</version > </dependency > </dependencies > <build > <finalName > ssm-demo</finalName > <pluginManagement > <plugins > <plugin > <artifactId > maven-clean-plugin</artifactId > <version > 3.1.0</version > </plugin > <plugin > <artifactId > maven-resources-plugin</artifactId > <version > 3.0.2</version > </plugin > <plugin > <artifactId > maven-compiler-plugin</artifactId > <version > 3.8.0</version > </plugin > </plugins > </pluginManagement > </build > </project >
2.2 配置文件 1.spring配置文件
Spring是一个大的容器,可以基于配置文件创建、管理bean对象,Spring2.5之前必须通过XML文件提 供配置信息。配置文件名没有规范,可以随意,如:applicationContext.xml,以下是基本配置文件示例:
1
2
3
4
5
6
<?xml version="1.0" encoding="UTF-8"?> <beans xmlns ="http://www.springframework.org/schema/beans" xmlns:xsi ="http://www.w3.org/2001/XMLSchema-instance" xmlns:p ="http://www.springframework.org/schema/p" xmlns:context ="http://www.springframework.org/schema/context" xsi:schemaLocation ="http://www.springframework.org/schema/beans http://www.springframework.org/schema/beans/spring-beans.xsd http://www.springframework.org/schema/context https://www.springframework.org/schema/context/spring-context.xsd" > </beans >
配置解析:
xmlns: XML Namespace的缩写,可译为“XML命名空间”,主要为了解决两个文档包含同名 元素时引发的命名冲突。
xmlns:xsi:定义一个Schema的实例命名空间。只有做了这个定义才能使用 schemaLocation属性。
xsi:schemaLocation:定义了XML Namespace和对应的XSD(Xml Schema Definition)文 档的位置的关系。
注意 :maven工程需要将这个放在 resources 目录下
2.3启动容器API ApplicationContext 表示Spring容器,负责根据配置文件创建、组装对象实例,常用实现:
ClassPathXmlApplicationContext:从classpath下加载配置文件,根路径为classpath
FileSystemXmlApplicationContext:按照文件路径加载配置文件
示例:
1 2 3 4 5 ApplicationContext applicationContext = new ClassPathXmlApplicationContext("applicationContext.xml" ); ApplicationContext fileSystemXmlContext = new FileSystemXmlApplicationContext("applicationContext.xml" );
2.4 容器日志 2.4.1 Commons Logging Spring使用的日志工具是Jakarta Commons Logging API(JCL),Common-Logging为其他日志工具 提供一个抽象层,主要为中间件和工具开发者提供日志系统的切換: Commons Logging会自动查找可用的日志系统, Commons Logging装载日志系统的流程如下:
查找名为org.apache.commons.logging.Log的属性配置,该属性可通过代码或者配置文件<commons-logging.properties>配置。如配置使用log4j2:
1
2
3
># commons-logging.properties 配置文件内容 >org.apache.commons.logging.Log =org.apache.commons.logging.impl.Log4JLogger >org.apache.commons.logging.LogFactory =org.apache.commons.logging.impl.LogFactoryImpl
查找名为org.apache.commons.logging.Log的系统属性 。
如果Log4J日志记录系统在应用程序类路径中可用,使用相应的包装器类(Log4JLogger)。
如果应用程序在JDK 1.4系统上执行,使用相应的包装器类(Jdk14Logger)。
默认的简单日志记录包装器(SimpleLog)。
示例:
1
2
3
4
public static Log log = LogFactory.getLog(Test.class);public static void main (String[] args) log.info("TEST commons - logging" ); }
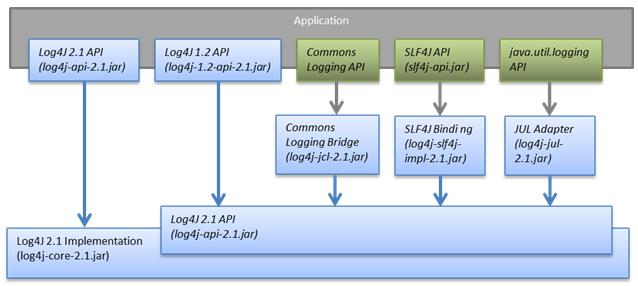
2.4.2 Log4J2 Log4j2是Java中使用频率非常高的日志系统,Commons Logging 可以桥接到Log4j2,使用步骤如下:
1. 导入Log4j2相关包:
log4j-jcl-2.7.jar:与Commons Logging 的桥接包
log4j-core-2.7.jar:log4j的实现
log4j-api-2.7.jar:日志接口和创建Logger实例的工具类,便于log4j桥接到其它日志工具,如: SLF4
2. 配置Commons Logging使用Log4j2(可选)
Commons Logging可以自动查找类路径下的日志系统,如需指定,可以在类路径下创建 commonslogging.properties 配置文件
3. Log4j2配置文件
1
2
3
4
5
6
7
8
9
10
11
12
13
14
15
16
17
18
19
20
21
22
23
24
25
26
27
28
29
30
31
32
33
34
35
36
37
38
39
40
41
42
43
44
<?xml version="1.0" encoding="UTF-8"?> <configuration status ="error" > <appenders > <Console name ="Console" target ="SYSTEM_OUT" > <ThresholdFilter level="trace" onMatch="ACCEPT" onMismatch="DENY" /> <PatternLayout pattern="%d{HH:mm:ss.SSS} %-5level %class{36} %L %M - %msg%xEx%n"/> </Console > <File name ="log" fileName ="${sys:app.path}log/test.log" append ="false" > <PatternLayout pattern="%d{HH:mm:ss.SSS} %-5level %class{36} %L %M - %msg%xEx%n"/> </File > <RollingFile name ="RollingFile" fileName ="${sys:app.path}logs/app.log" filePattern ="log/$${date:yyyy-MM}/app-%d{MM-dd-yyyy}-%i.log.gz" > <PatternLayout pattern="%d{HH:mm:ss.SSS} %-5level %class{36} %L %M - %msg%xEx%n"/> <SizeBasedTriggeringPolicy size ="50MB" /> </RollingFile > </appenders > <loggers > <root level ="debug" > <appender-ref ref ="RollingFile" /> <appender-ref ref ="Console" /> </root > <Logger name ="com.demo" level ="debug" additivity ="false" > <appender-ref ref ="Console" /> </Logger > </loggers > </configuration >
其它日志工具桥接log4j:
三、Spring常用模块 3.1 IOC (Inversion of Control)
IOC :inversion of control 控制反转。
DI :dependency injection 依赖注入, ioc 的另一种叫法,更能体现这个模块的功能
spring-beans 和 spring-context 是 Spring Framework 的 IOC 容器的根本 。 BeanFactory 接口提供了 一种能够管理任何类型对象的高级配置机制。ApplicationContext 是 BeanFactory 的一个子接口。ApplicationContext 使得与Spring 的AOP集成变得更简单,添加了资源处理(国际化中使用)、事件发布,以及特定于应用程序层的上下文,例如 WebApplicationContext, 简而言之,BeanFactory提供了配置框架和基本功能,而ApplicationContext 添加了更多企业应用功能。ApplicationContext 完整扩展了BeanFactory。
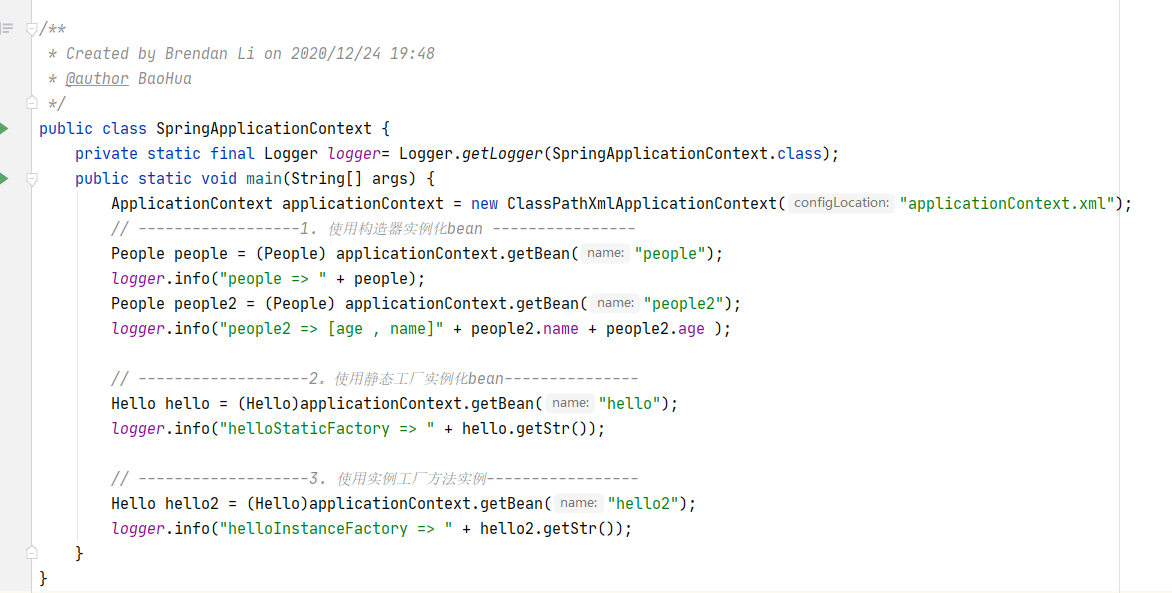
3.1.1 基于XML 配置IOC 3.1.1.1 创建Bean applicationContext.xml :
使用构造器实例化Bean
1
2
3
4
5
6
7
8
9
10
11
12
13
14
15
16
17
18
<?xml version="1.0" encoding="UTF-8"?> <beans xmlns ="http://www.springframework.org/schema/beans" xmlns:xsi ="http://www.w3.org/2001/XMLSchema-instance" xsi:schemaLocation ="http://www.springframework.org/schema/beans http://www.springframework.org/schema/beans/spring-beans.xsd" > <bean id ="people" class ="com.brendan.app.model.People" /> <bean id ="people2" class ="com.brendan.app.model.People" > <constructor-arg index ="0" value ="6" /> <constructor-arg index ="1" value ="Hello" /> <constructor-arg index ="2" ref ="people" /> </bean > </beans >
使用静态工厂方式实例化Bean
1
2
3
4
5
6
7
8
9
10
11
12
13
14
15
16
17
18
public class Hello private String str; public Hello () } public Hello (String str) this .str = str; } public String getStr () return str; } public void setStr (String str) this .str = str; } }
HelloInstanceFactory 创建静态方法
1
2
3
4
5
6
public class HelloInstanceFactory public static Hello newInstanceHello (String s) return new Hello(s); } }
1 2 3 4 5 6 7 8 <bean id ="hello" class ="com.brendan.app.factory.HelloInstanceFactory" factory-method ="newInstanceHello" > <constructor-arg index ="0" value ="This is String!" /> </bean >
使用实例工厂方法实例化Bean
Hello实体对象同上,HelloInstanceFactory2 去掉了 static 关键字。
1
2
3
4
5
6
public class HelloInstanceFactory2 public Hello newInstanceHello (String s) return new Hello(s); } }
1 2 3 4 5 6 7 8 <bean id ="factory" class ="com.brendan.app.factory.HelloInstanceFactory2" /> <bean id ="hello2" factory-bean ="factory" factory-method ="newInstanceHello" > <constructor-arg index ="0" value ="This is Instance Factory Bean!" /> </bean > <bean id ="user21" class ="com.brendan.app.factory.MyFactoryBean" />
FactoryBean接口是插入到Spring IoC容器用来定制实例化逻辑的一个接口点。如果初始化逻辑比 较复杂,可以通过FactoryBean实例化:
FactoryBean接口提供三个方法:
Object getObject():返回一个由这个工厂创建的对象实例。这个实例可能被共享(取决于 isSingleton()的返回值是singleton或prototype)
boolean isSingleton():如果要让这个FactoryBean创建的对象实例为singleton则返回 true,否则返回false。
Class getObjectType():返回通过getObject()方法返回的对象类型,如果该类型无法预料则 返回null。
3.1.1.2 依赖注入
注 : 三种方式使用一种即可
3.1.1.2.1 构造器注入
构造器注入可以根据参数索引注入、参数类型注入或Spring3支持的参数名注入 。参数名注入是有限制的,需要在编译时打开调试模式(即在编译时使用“javac –g:vars”选项,在class文件中生成变量调试信息,默认是不包含变量调试信息的),否则获取不到参数名字,或在构造器上使用注解 @ConstructorProperties来指定参数名 -> @ConstructorProperties({"age", "name"})。
3.1.1.2.2 属性注入
属性注入是指通过调用bean的属性设置方法来注入依赖项,在bean中需要存在对应的set方法。
3.1.1.2.3 注解注入
也可以使用注解配置依赖注入,注解注入是不需要提供Setter方法的,Spring通过泛型修改依赖项的访问控制,然后直接设置属。但是需要通过配置项<context:annotation-config/>或者<context:component-scan base-package=""/> 来加载对应的注解处理器。
实例:
1
2
3
4
5
@Service("userService") public class UserService implements IUserService @Autowired private IUserDAO userDAO = null ; }
具体配置如下:
1
2
3
4
5
6
7
8
9
10
11
12
13
14
15
16
17
18
19
20
21
22
23
24
25
26
27
28
29
30
31
32
33
34
35
36
<?xml version="1.0" encoding="UTF-8"?> <beans xmlns ="http://www.springframework.org/schema/beans" xmlns:xsi ="http://www.w3.org/2001/XMLSchema-instance" xmlns:p ="http://www.springframework.org/schema/p" xmlns:context ="http://www.springframework.org/schema/context" xsi:schemaLocation ="http://www.springframework.org/schema/beans http://www.springframework.org/schema/beans/spring-beans.xsd http://www.springframework.org/schema/context https://www.springframework.org/schema/context/spring-context.xsd" > <bean id ="user" class ="com.brendan.app.model.User" > <property name ="name" value ="hua_hua" /> <property name ="age" value ="18" /> </bean > <bean id ="user1" class ="com.brendan.app.model.User" > <constructor-arg name ="name" index ="0" value ="zhang-san" /> <constructor-arg name ="age" index ="1" value ="18" /> <constructor-arg name ="userName" index ="2" value ="admin" /> <constructor-arg name ="password" index ="3" value ="password" /> </bean > <bean id ="user2" class ="com.brendan.app.model.User" > <property name ="userName" value ="admin" /> <property name ="password" value ="admin" /> </bean > <bean id ="user22" class ="com.brendan.app.model.User" p:userName ="admin" p:password ="admin" /> <context:annotation-config /> <context:component-scan base-package ="com.brendan.app" /> </beans >
自动注入
Spring可以自动按照名称或者类型注入依赖,自动注入默认是禁用的,可以通过以下方式之一启用:
在中通过autowire=”” 配置,只对这个生效
在中通过default-autowire=””配置,当前文件中所有都生效
autowire=”” 可取的值如下:
default: 默认值,根据全局default-autowire=””.默认全局和局部都没有配置情况下,相当于no
no: 不自动注入
byName: 通过名称自动注入(bean的set方法).在Spring容器中找类的Id
byType: 根据类型注入,容器中依赖的同类型bean只能有一个,否则抛出异常
constructor: 根据构造方法注入.
3.1.2 基于注解配置IOC 为了缩减XML的体积,以及把配置元数据和代码放在一起,Spring2.5开始支持基于注解的配置,总体 的思路是让Spring扫描类路径下的Class,通过反射检查是否有特定注解,如果类上存在@Service一类 的注解则实例化该类为bean,依赖注入由自动注册的相关BeanPostProcessor 根据注解来完成。
3.1.2.1 获取上下文 1 2 3 4 5 6 7 ClassPathXmlApplicationContext context = new ClassPathXmlApplicationContext("applicationContext_aop.xml" ); UserService userService = (UserService)context.getBean("userService" ); userService.create();
3.1.2.2 创建Bean 1 2 3 4 5 6 7 8 9 10 11 12 <?xml version="1.0" encoding="UTF-8"?> <beans xmlns ="http://www.springframework.org/schema/beans" xmlns:xsi ="http://www.w3.org/2001/XMLSchema-instance" xmlns:context ="http://www.springframework.org/schema/context" xsi:schemaLocation ="http://www.springframework.org/schema/beans http://www.springframework.org/schema/beans/spring-beans.xsd http://www.springframework.org/schema/context https://www.springframework.org/schema/context/spring-context.xsd" > <context:component-scan base-package ="com.brendan.app" /> </beans >
context:component-scan:
如果解析配置文件时发现该标签,将会由ComponentScanBeanDefinitionParser解析标 签,然后通过ClassPathBeanDefinitionScanner扫描类,处理的注解:
@Component,所有受Spring管理的组件的通用形式; 而@Repository、@Service和 @Controller则是@Component的细化, 用来表示更具体的组件。
@Service,服务层, @Scope(“prototype”)可以和Service组合使用,来指定scope的属性。
@Controller,表现层
@Repository, 持久化层
AutowiredAnnotationBeanPostProcessor 和CommonAnnotationBeanPostProcessor会隐式地被包括进来,不再需要context:annotation-config配置项。
base-package: 可以使用如下字符组合路径,实际查找时使用的是转换后的路径(前面加 classpath :,后面加/* */ *.class) Apache Ant样式的路径有三种通配符匹配方法,这些可以组合出很多种灵活的路径模式。
3.1.2.3 依赖注入 基于注解的依赖注入需要特殊的BeanPostProcessor,这些特殊的BeanPostProcessor 可以通过两种方式创建:
<context:annotation-config /> ,隐式注册的部分post-processors:
AutowiredAnnotationBeanPostProcessor : @Autowired
CommonAnnotationBeanPostProcessor:支持常用的Java注解,特别是javax.annotation包 中的JSR-250注释。 许多Java EE 5以及Java 6的JAX-WS的Java注释都支持。 @Resource
<context:component-scan />,开启自动扫描的时候隐式注册
AutowiredAnnotationBeanPostProcessor
CommonAnnotationBeanPostProcessor
BeanPostProcessor与注解依赖注入:
@Autowired:按照类型自动装配,可以放置在构造方法、属性、参数等地方,按类型自动注入
@Qualifier(“userDao”):通过类型的自动注入可能会有多个候选,可以结合这个注解来指定bean 的名称 ,单独使用无效
@Resource、@Resource(“userDao”),相当于@Autowired、@Qualifier(“userDao”)的组合
3.1.3 Bean的作用域 通过scope=””指定bean对象的生存周期,scope=” “ 可取值:
globalSession:类似于标准HTTP Session范围,只适用于基于portlet的web应用程序的上下文
singleton:bean在IOC容器中以单例方式存在,默认值
prototype:每次调用Bean时,都返回一个新的实例
request:每次请求都创建一个bean,只在web相关的ApplicationContext中可用
session:每个会话都创建一个bean,只在web相关的ApplicationContext中可用
3.1.4 Bean的生命周期 Spring自带了两种不同类型的容器。两种容器的的bean生命周期略有不同。
bean工厂(由org.springframework.beans.factory.BeanFactory接口定义)是最简单的容器,提供基本的DI 支持。
应用上下文(由org.springframework.context.ApplicationContext接口定义),基于BeanFactory 构建,并提供应用框架级别的服务,例如 从属性文件解析文本信息以及发布应用事件给感兴趣的事件监听者。
ApplicationContext Bean生命周期:
Spring对bean进行实例化;
Spring将值和bean的引用注入到bean对应的属性中;
如果bean实现了BeanNameAware接口,Spring将bean的ID传递给setBean-Name()方法;
如果bean实现了BeanFactoryAware接口,Spring将调用setBeanFactory()方法,将BeanFactory 容器实例传入;
如果bean实现了ApplicationContextAware接口,Spring将调用setApplicationContext()方法,将 bean所在的应用上下文的引用传入进来;
如果上下文中存在实现了BeanPostProcessor接口的bean,Spring将调用它们的 postProcessBeforeInitialization()方法;
如果bean实现了InitializingBean接口,Spring将调用它们的after-PropertiesSet()方法。
如果bean使用init-method声明了初始化方法,该方法被调用;
如果上下文中存在实现了BeanPostProcessor接口的bean,Spring将调用它们的 postProcessAfterInitialization()方法; 经过以上过程之后,就可以正式使用该Bean了,对于 scope为singleton的Bean,它们将一直驻留在应用上下文中,直到该应用上下文被销毁;而对于 scope为prototype的Bean,每次被调用都回new一个对象,而且生命周期也交给调用方管理了,不 再是Spring容器进行管理了。
容器关闭后,如果Bean实现了DisposableBean接口,则会调用该接口的destroy()方法。
如果Bean配置了destroy-method方法,则会执行destroy-method配置的方法,至此,整个Bean 生命周期结束。
BeanFactory Bean生命周期: 与ApplicationContext相比,有如下几点不同:
BeanFactory容器中,不会调用ApplicationContextAware接口的setApplicationContext()方法。
BeanPostProcessor接口的postProcessBeforeInitialization方法和postProcessAfterInitialization 方法不会自动调用,必须自己通过代码手动注册
BeanFactory容器启动的时候,不会去实例化所有bean,包括所有scope为singleton且非延迟加载的bean也是一样,而是在调用的时候去实例化。
3.2 AOP (Aspect Oriented Programming) 面向切面编程(AOP) 通过提供另外一种思考程序结构的途经来弥补面向对象编程(OOP)的不足。在 OOP中模块化的关键单元是类(classes),而在AOP中模块化的单元则是切面。切面能对关注点进行模块化,例如横切多个类型和对象的事务管理。(在AOP术语中通常称作横切(crosscutting)关注点。)
3.2.1 AOP 的基本概念
一个关注点的模块化,是通知和切点的结合。通知和切点共同定义了切面的全部内容——它是什么,在 何时和何处完成其功能 。
连接点是在应用执行过程中能够插入切面的一个点。这个点可以是调用方法时、抛出异常时、甚至修改 一个字段时。切面代码可以利用这些点插入到应用的正常流程之中,并添加新的行为。因为Spring基于 代理实现AOP,所以只支持方法连接点。
在切面的某个特定的连接点上执行的动作。Spring切面可以应用5种类型的通知:
前置通知(Before):在目标方法被调用之前调用通知功能;
后置通知 (After):在目标方法完成之后调用通知,此时不会关心方法的输出是什么;
返回通知 (AfterReturning):在目标方法成功执行之后调用通知;
异常通知 (AfterThrowing):在目标方法抛出异常后调用通知;
环绕通知(Around):通知包裹了被通知的方法,在被通知的方法调用之前和调用之后执行自定义的行为。
引入通知(Introduction):用来给一个类型声明额外的方法或属性。Spring允许引入新的接口 (以及一个对应的实现)到任何被代理的对象。可以在无需修改现有的类的情况下,让它们具有新 的行为和状态。
切入点是匹配连接点的表达式。通知和一个切入点表达式关联,并在满足这个切入点的连接点上运行。 一个切面并不需要通知应用的所有连接点。切点有助于缩小切面所通知的连接点的范围。
被一个或者多个切面所通知的对象。也被称做被通知(advised)对象。 既然Spring AOP是通过运行时 代理实现的,这个对象永远是一个被代理(proxied)对象。
AOP框架创建的对象,用来实现切面(例如通知方法执行等等)。在Spring中,AOP代理可以是JDK动态代理或者CGLIB代理。
织入是把切面应用到目标对象并创建新的代理对象的过程。切面在指定的连接点被织入到目标对象中。 在目标对象的生命周期里有多个点可以进行织入:
编译期:切面在目标类编译时被织入。这种方式需要特殊的编译器。AspectJ的织入编译器就是以 这种方式织入切面的。
类加载期:切面在目标类加载到JVM时被织入。这种方式需要特殊的类加载器(ClassLoader), 它可以在目标类被引入应用之前增强该目标类的字节码。AspectJ 5的加载时织入(loadtimeweaving,LTW)就支持以这种方式织入切面。Spring可以通过spring-instrument使用 AspectJ 的加载时植入。
运行期:切面在应用运行的某个时刻被织入。一般情况下,在织入切面时,AOP容器会为目标对象 动态地创建一个代理对象。Spring AOP默认就是以这种方式织入切面的。
3.2.2 Spring AOP 3.2.2.1 Spring AOP的支持 Spring提供了4种类型的AOP支持:
基于XML配置,使用ProxyFactoryBean生成代理对象,相对纯POJO切面和基于注解的AOP,Spring经典的AOP看起来比较笨重和过于复杂。
借助Spring的aop命名空间,我们可以将纯POJO转换为切面。实际上,这些POJO只是提供了满足切点条件时所要调用的方法。遗憾的是,这种技术需要XML配置,但这的确是声明式地将对象转换为切面的简便方式。
Spring借鉴了AspectJ的切面,以提供注解驱动的AOP。本质上,它依然是Spring基于代理的AOP,但是编程模型几乎与编写成熟的AspectJ注解切面完全一致。这种AOP风格的好处在于能够不使用XML来完成功能。
如果AOP的切点要求不只是方法 (如构造器或属性拦截),那么需要考虑使用AspectJ来实现切面。
前三种都是Spring AOP实现的变体。Spring AOP构建在动态代理基础之上,因此,Spring对AOP的支持局限于方法拦截。
3.2.2.2 工程依赖 Spring AOP是基于IOC的,在IOC的工程依赖基础上需要导入AOP相关的包,如果是Maven工程,则需 要加入以下依赖配置:
1 2 3 4 5 6 7 8 9 10 11 12 13 <dependency > <groupId > org.springframework</groupId > <artifactId > spring-aop</artifactId > <version > ${spring-version}</version > </dependency > <dependency > <groupId > org.springframework</groupId > <artifactId > spring-aspects</artifactId > <version > ${spring-version}</version > </dependency >
Spring-AOP 最小类库需求:
JAR
说明
spring-aop-4.3.8.RELEASE.jar
spring-aspects-4.3.8.RELEASE.jar
aspectjweaver-1.8.9.jar
解析切点定义表达式的依赖包
3.2.2.3 配置文件 选择什么风格的配置:
1 2 3 4 5 <?xml version="1.0" encoding="UTF-8"?> <beans xmlns ="http://www.springframework.org/schema/beans" xmlns:xsi ="http://www.w3.org/2001/XMLSchema-instance" xmlns:aop ="http://www.springframework.org/schema/aop" xsi:schemaLocation ="http://www.springframework.org/schema/beans http://www.springframework.org/schema/beans/spring-beans.xsd http://www.springframework.org/schema/aop https://www.springframework.org/schema/aop/spring-aop.xsd" > </beans >
XML风格对现有的Spring用户来说更加习惯,而且从配置中可以清晰的表明在系统中存在那些切 面。但是有如下的缺点: 它不能完全将需求实现的地方封装到一个位置。 XML风格同@AspectJ风格所能表达的内容相比有更多的限制。
@AspectJ风格支持其它的实例模型以及更丰富的连接点组合。它具有将切面保持为一个模块单元的优点。 还有一个优点是@AspectJ切面能被Spring AOP和AspectJ两者都理解,可以迁移到 AspectJ的AOP。
3.2.3 AOP 的实现 3.2.3.1 经典AOP 完全基于XML进行配置,通知需要实现对应的接口
获取上下文
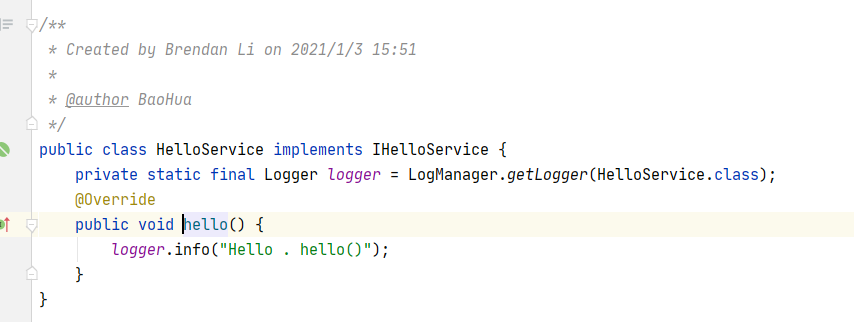
1 2 3 4 5 6 7 8 9 10 11 12 public class SpringContextAop private static final Logger logger= Logger.getLogger(SpringContextAop.class); public static void main (String[] args) ApplicationContext context = new ClassPathXmlApplicationContext("applicationContext_aop.xml" ); IHelloService helloService = context.getBean("helloService" , IHelloService.class); helloService.hello(); } }
applicaitonContext_aop.xml
1 2 3 4 5 6 7 8 9 10 11 12 13 14 15 16 17 18 19 20 21 22 23 24 25 26 <beans xmlns ="http://www.springframework.org/schema/beans" xmlns:xsi ="http://www.w3.org/2001/XMLSchema-instance" xsi:schemaLocation ="http://www.springframework.org/schema/beans http://www.springframework.org/schema/beans/spring-beans.xsd" > <bean id ="helloServiceTarget" class ="com.brendan.app.service.HelloService" /> <bean id ="beforeAdvice" class ="com.brendan.app.config.MyMethodBeforeAdvice" /> <bean id ="helloService" class ="org.springframework.aop.framework.ProxyFactoryBean" > <property name ="interfaces" value ="com.brendan.app.service.IHelloService" /> <property name ="target" ref ="helloServiceTarget" /> <property name ="interceptorNames" > <list > <value > beforeAdvice</value > </list > </property > </bean > </beans >
定义通知
1 2 3 4 5 6 7 8 9 10 11 12 13 14 public class MyMethodBeforeAdvice implements MethodBeforeAdvice private static final Logger logger= LogManager.getLogger(MyMethodBeforeAdvice.class); @Override public void before (Method method, Object[] args, Object target) logger.info("Before Advice Method => " + method.getName() + " args => " + args.length + " Target Object Class => " + target.getClass()); } }
==<property name="proxyTargetClass" value="true"/> 使用cglib代理来进行测试, value 属性值为 true 时,表示使用 CGLIB 代理,属性值为 false 时,表示使用 JDK 动态代理==
3.2.3.2 纯POJO切面 通知不需要实现相关接口,只是一个简单的java类,切点和切面的定义在XML中 。
由于spring在解析切点的定义时 (org.springframework.aop.aspectj.AspectJExpressionPointcut),使用的是aspectj的工具类 ,所以需要导入aspectjweaver.jar。 如果被代理的目标对象实现了至少一个接口,则会使用JDK动态代理 。所有该目标类型实现的接口都将 被代理。 若该目标对象没有实现任何接口,则创建一个CGLIB代理 。也可以通过proxy-target-class调整。cglib的相关类文件打包在了spring-core-*.RELEASE.jar中。
POJO : Plain Ordinary Java Object)简单的Java对象,实际就是普通JavaBean
获取上下文
1 2 3 4 5 6 7 8 9 10 11 12 13 public class SpringApplication public static void main (String[] args) ApplicationContext applicationContext = new ClassPathXmlApplicationContext("applicationContext.xml" ); UserService userService =(UserService) applicationContext.getBean("userServiceImpl" ); userService.create(); } }
applicationContext.xml
1 2 3 4 5 6 7 8 9 10 11 12 13 14 15 16 17 18 19 20 21 22 <?xml version="1.0" encoding="UTF-8"?> <beans xmlns ="http://www.springframework.org/schema/beans" xmlns:xsi ="http://www.w3.org/2001/XMLSchema-instance" xmlns:aop ="http://www.springframework.org/schema/aop" xsi:schemaLocation ="http://www.springframework.org/schema/beans http://www.springframework.org/schema/beans/spring-beans.xsd http://www.springframework.org/schema/aop https://www.springframework.org/schema/aop/spring-aop.xsd" > <bean id ="traceLog" class ="com.demo.spring.pojo.TraceLog" /> <aop:config proxy-target-class ="false" > <aop:aspect id ="log" ref ="traceLog" > <aop:pointcut id ="addAllMethod" expression ="execution(* com.demo.spring.service.impl.UserServiceImpl.*())" /> <aop:before method ="before" pointcut-ref ="addAllMethod" /> </aop:aspect > </aop:config > <bean id ="userServiceImpl" class ="com.demo.spring.service.impl.UserServiceImpl" /> </beans >
切点定义表达式
1 >execution(<修饰符模式> ? <返回值模式> <方法名模式>(<参数模式>) <异常模式>?)
各部分说明:
修饰符模式: 可选,如public、protected;
返回值类型 : 可以是任何类型模式; 方法名 : 可以使用“*”进行模式匹配; 参数列表 : “()”表示方法没有任何参数; 异常列表: 可选,以“throws 异常全限定名列表”声明,异常全限定名列表如有多个 以“,”分割,如throws java.lang.IllegalArgumentException, java.lang.ArrayIndexOutOfBoundsException。
注意:除了返回类型模式、方法名模式和参数模式外,其它项都是可选的。
类型匹配的通配符:
* :匹配任何数量字符; .. :匹配任何数量字符重复,如在的类型模式中匹配任何数量子包;而在方法参数模式中匹配任何数量参数。 + :匹配指定类型的子类型;仅能作为后缀放在类型模式后边。
例如:
java.lang.String :匹配String类型;
java.*.String : 匹配java包下的任何“一级子包”下的String类型; 如匹配 java.lang.String,但不匹配java.lang.ss.String *
java.. :匹配java包及任何子包下的任何类型; 如匹配 java.lang.annotation.Annotation 、java.lang.String、
java.lang.*ing 匹配任何java.lang包下的以ing结尾的类型;
java.lang.Number+ 匹配java.lang包下的任何Number的子类型;如匹配 java.lang.Integer,也匹配java.math.BigInteger
TraceLog.java
1 2 3 4 5 6 7 8 9 10 11 12 13 14 15 16 17 18 19 20 21 22 23 24 25 26 27 28 29 30 31 32 33 34 package com.demo.spring.pojo;import com.sun.istack.internal.logging.Logger;import org.aspectj.lang.ProceedingJoinPoint;public class TraceLog private static final Logger logger= Logger.getLogger(TraceLog.class); public void before () logger.info(" 前置通知 " ); } public void after () logger.info(" 后置通知 " ); } public void afterReturning (Object retVal) logger.info(" 返回通知 ,返回值= > " + (retVal == null ? "" : retVal.toString())); } public void afterThrowing (Exception ex) logger.info(" 异常通知 : 异常信息=> " + ex); } public Object around (ProceedingJoinPoint proceedingJoinPoint) throws Throwable logger.info(" 环绕通知 : 代理目标 => " + proceedingJoinPoint.getTarget().getClass()); return proceedingJoinPoint.proceed(); } }
3.2.3.3 @AspectJ 切面 AspectJ 5使用了Java注解定义切面,Spring 使用了和AspectJ 5一样的注解,并使用AspectJ来做切入点 解析和匹配。 但是,AOP在运行时仍旧是纯的Spring AOP,并不依赖于AspectJ的编译器或者织入器 (weaver)。
启用@AspectJ注解定义aop:
1:通过在Spring的配置中引入下列元素来启用Spring对@AspectJ的支持:<aop:aspectj-autoproxy/> ,该配置告诉Spring容器,AOP要通过注解来定义,注解信息在加入 @Aspect注解的类中 。
2:AOP并不知道切面的定义在哪些类里,所以需要让Spring容器创建包含切面定义类的实例,从而找到切面定义:
<bean id="traceLog" class="com.demo.spring.aspectj.TraceLog" />
当让也可以在配置类中同时加入@Component注解,由Spring的自动扫描类扫描AOP注解定义所在的 类,然后注册到上下文。
获取上下文
1 2 3 4 5 6 7 8 9 10 11 12 13 14 public class SpringApplication public static void main (String[] args) ApplicationContext applicationContext = new ClassPathXmlApplicationContext("applicationContext_aspectj.xml" ); UserService userService =(UserService) applicationContext.getBean("userServiceImpl" ); userService.create(); } }
切点定义类
1 2 3 4 5 6 7 8 9 10 11 12 13 14 15 16 17 18 19 20 21 22 23 24 25 26 27 28 29 30 @Aspect public class TraceLog private static final Logger logger= Logger.getLogger(TraceLog.class); @Pointcut("execution(* com.demo.spring..service.*.*(..))") public void businessService () } @Before("com.demo.spring.aspectj.TraceLog.businessService()") public void before () logger.info(" ---- before ---- " ); } }
applicationContext_aspectj.xml
1 2 3 4 5 6 7 8 9 10 11 12 13 14 15 16 <?xml version="1.0" encoding="UTF-8"?> <beans xmlns ="http://www.springframework.org/schema/beans" xmlns:xsi ="http://www.w3.org/2001/XMLSchema-instance" xmlns:aop ="http://www.springframework.org/schema/aop" xsi:schemaLocation ="http://www.springframework.org/schema/beans http://www.springframework.org/schema/beans/spring-beans.xsd http://www.springframework.org/schema/aop https://www.springframework.org/schema/aop/spring-aop.xsd" > <aop:aspectj-autoproxy /> <bean id ="traceLog" class ="com.demo.spring.aspectj.TraceLog" /> <bean id ="userServiceImpl" class ="com.demo.spring.service.impl.UserServiceImpl" /> </beans >
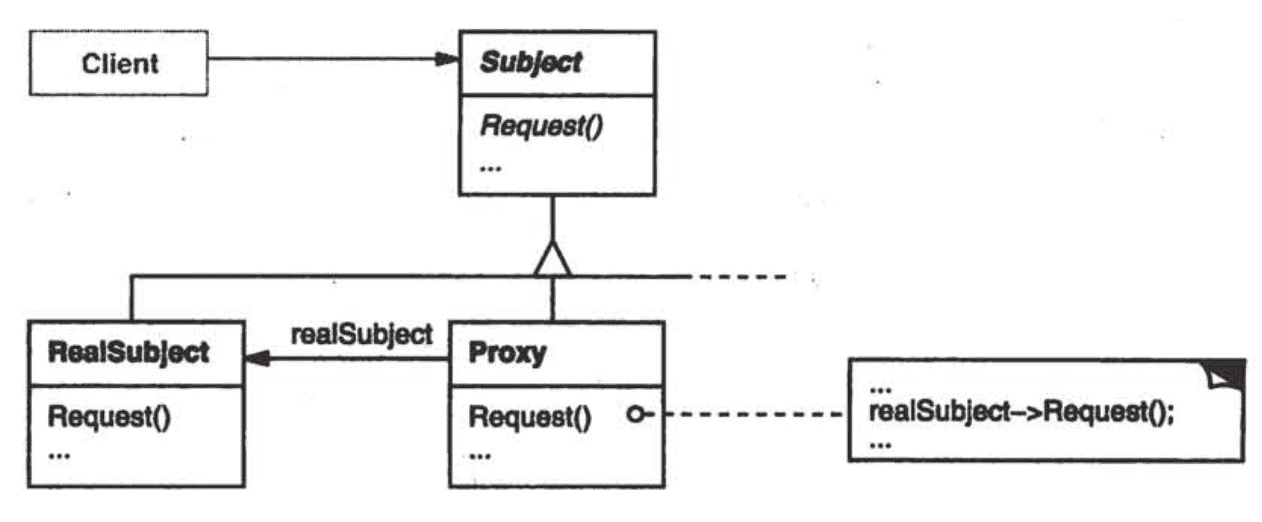
3.2.4 代理模式 为其他对象提供一种代理以控制对这个对象的访问。
3.2.4.1 静态代理 静态代理是由程序员创建或工具生成代理类的源码,再编译代理类。所谓静态也就是在程序运行前就已经存在代理类的字节码文件,代理类和委托类的关系在运行前就确定了。
Client.java
1 2 3 4 5 6 7 8 9 10 11 12 public class Client public static void main (String[] args) RoleService roleService = new ProxyRoleService(new RoleServiceImpl()); roleService.addRole(101 ); } }
RoleService.java
1 2 3 4 5 6 7 8 public interface RoleService void addRole (int id) }
ProxyRoleService.java
1 2 3 4 5 6 7 8 9 10 11 12 13 14 15 16 17 18 19 20 21 public class ProxyRoleService implements RoleService private RoleServiceImpl roleService = null ; public ProxyRoleService (RoleServiceImpl roleService) this .roleService = roleService; } @Override public void addRole (int id) if (id > 100 ) { throw new RuntimeException(); } roleService.addRole(id); } }
RoleServiceImpl.java
1 2 3 4 5 6 7 8 9 10 11 12 public class RoleServiceImpl implements RoleService @Override public void addRole (int id) System.out.println(" addRole : id -> " + id); } }
3.2.4.2 动态代理 动态代理是指在实现阶段不用关心代理类,代理类在运行阶段动态生成。
JDK动态代理 是面向接口 的,InvocationHandler 和 Proxy 只能为接口创建实例。
Cglib动态代理 ,对代理对象类的class文件加载进来,修改字节码,MethodInterceptor
JDK动态代理
Client.java
1 2 3 4 5 6 public class Client public static void main (String[] args) RoleService roleService = (RoleService) Factory.create(RoleService.class, new RoleServiceImpl()); roleService.addRole(100 ); } }
Factory.class
1 2 3 4 5 6 7 8 9 10 11 12 13 14 15 16 17 18 19 20 public class Factory public static Object create (Class<?> superClass, Object target) Handler handler = new Handler(target); return Proxy.newProxyInstance(Factory.class.getClassLoader(), new Class[]{superClass}, handler); } }
Handler.java
1 2 3 4 5 6 7 8 9 10 11 12 13 14 15 16 17 18 19 20 21 22 23 24 25 26 27 public class Handler implements InvocationHandler private Object targetObject = null ; public Handler (Object targetObject) this .targetObject=targetObject; } @Override public Object invoke (Object proxy, Method method, Object[] args) throws Throwable System.out.println(" ------Handler --- 执行方法调用前------- " ); if ("addRole" .equals(method.getName())) { int id = (int ) args[0 ]; if (id>100 ) { throw new RuntimeException(); } } Object obj = method.invoke(targetObject, args); System.out.println("--------- Handler --- 方法执行后------------" ); return obj; } }
Cglib动态代理
JDK动态代理要求被代理对象至少实现一个接口,如果被代理对象没有实现接口,则需要通过字节码工 具生成一个代理类,cglib使用ASM生成代理类。
Client.java
1 2 3 4 5 6 7 public class Client public static void main (String[] args) RoleService roleService = (RoleService) MyFactory.create(RoleServiceImpl.class); roleService.addRole(100 ); } }
MyFactory.java
1 2 3 4 5 6 7 8 9 10 11 12 13 14 15 16 17 public class MyFactory public static Object create (Class<?> superClass) Enhancer enhancer = new Enhancer(); enhancer.setSuperclass(superClass); enhancer.setCallback(new Interceptor()); return enhancer.create(); } }
Interceptor.java
1 2 3 4 5 6 7 8 9 10 11 12 13 14 15 16 17 18 19 20 21 22 23 24 25 26 27 28 29 public class Interceptor implements MethodInterceptor @Override public Object intercept (Object obj, Method method, Object[] objects, MethodProxy methodProxy) throws Throwable System.out.println("-----------Interceptor--->方法调用前--------------" ); if ("addRole" .equals(method.getName())) { int id = (int ) objects[0 ]; if (id>100 ) { throw new RuntimeException(); } } Object o = methodProxy.invokeSuper(obj, objects); System.out.println("-----------Interceptor--->方法调用后--------------" ); return o; } }
3.3 DAO (Data Access Object) 支撑 3.3.1 数据访问整合 Spring提供的DAO(数据访问对象)支持主要的目的是便于以标准的方式使用不同的数据访问技术,不仅可以方便地在这些持久化技术间切换, 而且在编码的时候不用考虑处理各种技术中特定的异常。
一致的异常体系 Spring提供了一种方便的方法,把特定于某种技术的异常,如SQLException, 转化为自己的异常,这种异常属于以DataAccessException 为根的异常层次。这些异常封装了原始异常对象,这样就不会有丢失任何错误信息的风险。
一致的DAO支持抽象类 为了便于以一种一致的方式使用各种数据访问技术,如JDBC、JDO和 Hibernate, Spring提供了一套抽象DAO类供你扩展。这些抽象类提供了一些方法,通过它们你可以获得与你当前使用的数据访问技术相关的数据源和其他配置信息。
3.3.1.1 工程依赖 Spring DAO支撑是基于IOC和AOP的,在IOC和AOP的工程依赖基础上需要导入DAO支撑相关的包,如果是Maven工程,则需要加入以下依赖配置:
1 2 3 4 5 6 7 8 9 10 11 12 13 14 <dependency > <groupId > org.springframework</groupId > <artifactId > spring-jdbc</artifactId > <version > ${spring-version}</version > </dependency > <dependency > <groupId > mysql</groupId > <artifactId > mysql-connector-java</artifactId > <version > ${mysql-version}</version > </dependency >
Spring-DAO支撑的最小类库需求:
JAR
说明
spring-jdbc-4.3.8.RELEASE.jar
spring-tx-4.3.8.RELEASE.jar
jdbc驱动
3.3.1.2 配置文件 1 2 3 4 <?xml version="1.0" encoding="UTF-8"?> <beans xmlns ="http://www.springframework.org/schema/beans" xmlns:xsi ="http://www.w3.org/2001/XMLSchema-instance" xsi:schemaLocation ="http://www.springframework.org/schema/beans http://www.springframework.org/schema/beans/spring-beans.xsd" >
3.3.2 整合JDBC
applicationContext_jdbc.xml
1 2 3 4 5 6 7 8 9 10 11 12 13 14 15 16 17 18 19 20 21 22 23 24 25 26 27 28 29 30 <?xml version="1.0" encoding="UTF-8"?> <beans xmlns ="http://www.springframework.org/schema/beans" xmlns:xsi ="http://www.w3.org/2001/XMLSchema-instance" xsi:schemaLocation ="http://www.springframework.org/schema/beans http://www.springframework.org/schema/beans/spring-beans.xsd" > <bean id ="dataSource" class ="org.springframework.jdbc.datasource.DriverManagerDataSource" > <property name ="driverClassName" value ="com.mysql.cj.jdbc.Driver" /> <property name ="url" value ="jdbc:mysql://localhost:3306/ssm?useUnicode=true& characterEncoding=utf8& serverTimezone=GMT%2B8" /> <property name ="username" value ="spring" /> <property name ="password" value ="spring" /> </bean > <bean id ="jdbcTemplate" class ="org.springframework.jdbc.core.JdbcTemplate" > <property name ="dataSource" ref ="dataSource" /> </bean > <bean id ="userDao" class ="com.demo.srping.dao.impl.UserDao" > <property name ="jdbcTemplate" ref ="jdbcTemplate" /> </bean > <bean id ="userDao2" class ="com.demo.srping.dao.impl.UserDao2" > <property name ="dataSource" ref ="dataSource" /> </bean > </beans >
获取上下文 JdbcApplicaiton.java
1 2 3 4 5 6 7 8 9 10 11 public class JdbcApplication public static void main (String[] args) ApplicationContext applicationContext = new ClassPathXmlApplicationContext("applicationContext_jdbc.xml" ); UserDao userDao = applicationContext.getBean("userDao" , UserDao.class); userDao.addUser("zhangsan" ,18 ); UserDao2 userDao2 = applicationContext.getBean("userDao2" , UserDao2.class); userDao2.addUser("lisi" ,18 ); } }
UserDao.java
1 2 3 4 5 6 7 8 9 10 11 12 13 14 15 16 17 18 19 20 21 22 public class UserDao implements IUserDao private JdbcTemplate jdbcTemplate; @Override public void addUser (String name, int age) String sql = "insert into users(name,age) values(" + "'" + name + "'," + age +")" ; jdbcTemplate.execute(sql); } public JdbcTemplate getJdbcTemplate () return jdbcTemplate; } public void setJdbcTemplate (JdbcTemplate jdbcTemplate) this .jdbcTemplate = jdbcTemplate; } }
UserDao2.java
1 2 3 4 5 6 7 8 9 10 11 12 13 public class UserDao2 extends JdbcDaoSupport implements IUserDao @Override public void addUser (String name, int age) String sql = "insert into users(name,age) values(" + "'" + name + "'," + age +")" ; super .getJdbcTemplate().execute(sql); } }
3.3.3 事务管理 Spring基于APO提供了事务管理,框架的事务支持提供了一致的事务管理抽象,这带来了以下好处:
为复杂的事务API提供了一致的编程模型,如JTA、JDBC、Hibernate、JPA和JDO
提供比大多数复杂的事务API(诸如JTA)更简单的,更易于使用的编程式事务管理API
支持声明式事务管理 与Spring的各种数据访问抽象完美结合
3.3.3.1 声明式事务 3.3.3.1.1 基于XML配置的事务 1 2 3 4 5 6 7 8 9 10 11 12 13 14 15 16 17 18 19 20 21 22 23 24 25 26 27 28 29 30 31 32 33 34 35 36 37 38 39 40 41 42 43 44 45 46 47 48 49 50 51 52 53 54 55 56 57 58 59 60 61 <?xml version="1.0" encoding="UTF-8"?> <beans xmlns ="http://www.springframework.org/schema/beans" xmlns:xsi ="http://www.w3.org/2001/XMLSchema-instance" xmlns:tx ="http://www.springframework.org/schema/tx" xmlns:aop ="http://www.springframework.org/schema/aop" xsi:schemaLocation ="http://www.springframework.org/schema/beans http://www.springframework.org/schema/beans/spring-beans.xsd http://www.springframework.org/schema/tx http://www.springframework.org/schema/tx/spring-tx.xsd http://www.springframework.org/schema/aop https://www.springframework.org/schema/aop/spring-aop.xsd" > <bean id ="dataSource" class ="org.springframework.jdbc.datasource.DriverManagerDataSource" > <property name ="driverClassName" value ="oracle.jdbc.driver.OracleDriver" /> <property name ="url" value ="jdbc:oracle:thin:@localhost:1521:ORCL" /> <property name ="username" value ="hr" /> <property name ="password" value ="hr" /> </bean > <bean id ="transactionManager" class ="org.springframework.jdbc.datasource.DataSourceTransactionManager" > <property name ="dataSource" ref ="dataSource" /> </bean > <tx:advice id ="txAdvice" transaction-manager ="transactionManager" > <tx:attributes > <tx:method name ="add*" read-only ="true" /> <tx:method name ="create*" isolation ="DEFAULT" propagation ="REQUIRED" read-only ="false" rollback-for ="java.lang.RuntimeException" /> <tx:method name ="*" /> </tx:attributes > </tx:advice > <aop:config > <aop:pointcut id ="service" expression ="execution(* com.demo.srping.service.*.*(..))" /> <aop:advisor advice-ref ="txAdvice" pointcut-ref ="service" /> </aop:config > <bean id ="jdbcTemplate" class ="org.springframework.jdbc.core.JdbcTemplate" > <property name ="dataSource" ref ="dataSource" /> </bean > <bean id ="userDao" class ="com.demo.srping.dao.impl.UserDao" > <property name ="jdbcTemplate" ref ="jdbcTemplate" /> </bean > <bean id ="userService" class ="com.demo.srping.service.impl.UserService" > <property name ="userDao" ref ="userDao" /> </bean > </beans >
3.3.3.1.2 基于注解配置的事务 将事务通知和切面的定义放入了java代码中
1 2 3 4 5 6 7 8 9 10 11 12 13 14 15 16 17 18 19 20 21 22 23 24 25 26 27 28 29 30 31 32 33 <?xml version="1.0" encoding="UTF-8"?> <beans xmlns ="http://www.springframework.org/schema/beans" xmlns:xsi ="http://www.w3.org/2001/XMLSchema-instance" xmlns:tx ="http://www.springframework.org/schema/tx" xmlns:aop ="http://www.springframework.org/schema/aop" xsi:schemaLocation ="http://www.springframework.org/schema/beans http://www.springframework.org/schema/beans/spring-beans.xsd http://www.springframework.org/schema/tx http://www.springframework.org/schema/tx/spring-tx.xsd http://www.springframework.org/schema/aop https://www.springframework.org/schema/aop/spring-aop.xsd" > <bean id ="dataSource" class ="org.springframework.jdbc.datasource.DriverManagerDataSource" > <property name ="driverClassName" value ="oracle.jdbc.driver.OracleDriver" /> <property name ="url" value ="jdbc:oracle:thin:@localhost:1521:ORCL" /> <property name ="username" value ="hr" /> <property name ="password" value ="hr" /> </bean > <bean id ="transactionManager" class ="org.springframework.jdbc.datasource.DataSourceTransactionManager" > <property name ="dataSource" ref ="dataSource" /> </bean > <tx:annotation-driven transaction-manager ="transactionManager" /> </beans >
四、脱离XML配置Spring 4.1 XML 和 注解混合使用 1 2 3 4 5 6 7 8 9 10 11 12 13 14 15 16 17 18 19 20 21 22 23 24 25 26 27 28 29 <?xml version="1.0" encoding="UTF-8"?> <beans xmlns ="http://www.springframework.org/schema/beans" xmlns:xsi ="http://www.w3.org/2001/XMLSchema-instance" xmlns:tx ="http://www.springframework.org/schema/tx" xsi:schemaLocation ="http://www.springframework.org/schema/beans http://www.springframework.org/schema/beans/spring-beans.xsd http://www.springframework.org/schema/tx http://www.springframework.org/schema/tx/spring-tx.xsd" > <bean id ="dataSource" class ="org.springframework.jdbc.datasource.DriverManagerDataSource" > <property name ="driverClassName" value ="oracle.jdbc.driver.OracleDriver" /> <property name ="url" value ="jdbc:oracle:thin:@localhost:1521:ORCL" /> <property name ="username" value ="hr" /> <property name ="password" value ="hr" /> </bean > <bean id ="transactionManager" class ="org.springframework.jdbc.datasource.DataSourceTransactionManager" > <property name ="dataSource" ref ="dataSource" /> </bean > <bean id ="jdbcTemplate" class ="org.springframework.jdbc.core.JdbcTemplate" > <property name ="dataSource" ref ="dataSource" /> </bean > <tx:annotation-driven transaction-manager ="transactionManager" /> </beans >
4.2 注解 和 Java代码使用 Spring3开始支持通过Java代码来配置Spring,Spring的配置可以完全脱离XML,通过注释和Java代码来 配置,常用注释如下:
@Configuration,表明当前类提供Spring配置文件的作用,Spring上下文会从当前类的注解中提取配置信息
1 2 3 4 @Configuration public class AppConfig }
相当于一个配置文件
@Import,导入其他类提供配置信息,也可以在初始化上下文时指定多个
1 2 3 4 5 @Configuration @Import(JdbcConfig.class) public class AppConfig { }
@ComponentScan, 开启组件扫描
1 2 3 4 5 6 @Configuration @Import(JdbcConfig.class) @ComponentScan("com.demo.spring") public class AppConfig }
相当于: <context:component-scan base-package=”com.demo.spring” />
@EnableAspectJAutoProxy,启用@AspectJ切面
1 2 3 4 5 6 7 @Configuration @Import(JdbcConfig.class) @ComponentScan("com.demo.spring") @EnableAspectJAutoProxy public class AppConfig }
相当于:<aop:aspectj-autoproxy />
@EnableTransactionManagement ,启用注解事务
1 2 3 4 5 6 7 8 @Configuration @Import(JdbcConfig.class) @ComponentScan("com.demo.spring") @EnableAspectJAutoProxy @EnableTransactionManagement public class AppConfig }
相当于:<tx:annotation-driven />
@ImportResource,导入XML格式的配置文件
XML配置文件的名称空间特有标签使用起来比较方便,可以使用这种方式与Java API方式混合使用
1 2 3 4 5 6 7 8 9 @Configuration @Import(JdbcConfig.class) @ComponentScan("com.demo.spring") @EnableAspectJAutoProxy @EnableTransactionManagement @ImportResource("classpath:/com/demo/spring/config/properties-config.xml") public class AppConfig }
@PropertySource,导入属性资源
1 2 3 4 5 6 7 8 9 10 @Configuration @Import(JdbcConfig.class) @ComponentScan("com.demo.spring") @EnableAspectJAutoProxy @EnableTransactionManagement @ImportResource("classpath:/com/demo/spring/config/properties-config.xml") @PropertySource("classpath:jdbc.properties") public class AppConfig }
相当于: <context:property-placeholder location=”classpath:jdbc.properties”/>
@Bean,放在方法前,表示该方法返回一个对象实例
1 2 3 4 5 6 7 8 9 10 11 12 13 14 15 16 17 18 19 20 21 22 23 24 25 26 27 28 29 30 31 32 33 34 35 36 37 38 @Configuration @Import(JdbcConfig.class) @ComponentScan("com.demo.spring") @EnableAspectJAutoProxy @EnableTransactionManagement @ImportResource("classpath:/com/demo/spring/config/properties-config.xml") @PropertySource("classpath:jdbc.properties") public class AppConfig @Bean public User user () return new User(); } @Bean(name = "user2") public User user2 () return new User(); } @Bean(name = "user3") @Scope("prototype") public User user3 () return new User(); } @Bean(name = "user4") @Scope("prototype") public User user4 () User user4=new User(); user4.setInnerUser(user3()); return user4; } }
相当于:
注意: 如果@Bean方法返回的是实现BeanPostProcessor或者BeanFactoryPostProcessor 接口的bean,则该方法在容器初始化阶段被调用,如果@Bean方法是非静态方法,会导致 AppConfig提前实例化。 提前实例化会导致AppConfig实例的增强失败,本类中的 @Value、@Autowired失效
@Value,使用上下文中的属性
1 2 3 4 5 6 7 8 9 10 11 12 @Configuration @Import(JdbcConfig.class) @ComponentScan("com.demo.spring") @EnableAspectJAutoProxy @EnableTransactionManagement @ImportResource("classpath:/com/demo/spring/config/properties-config.xml") @PropertySource("classpath:jdbc.properties") public class AppConfig @Value("${jdbc.url}") private String url; }
示例:
JdbcConfig.java
1 2 3 4 5 6 7 8 9 10 11 12 13 14 15 16 17 18 19 20 21 22 23 24 25 26 27 28 29 30 31 32 33 34 35 36 37 38 39 40 41 42 43 44 45 46 47 48 49 50 51 52 53 54 55 56 57 58 59 60 61 62 63 64 65 66 67 import org.springframework.beans.factory.annotation.Value;import org.springframework.context.annotation.Bean;import org.springframework.context.annotation.Configuration;import org.springframework.jdbc.core.JdbcTemplate;import org.springframework.jdbc.datasource.DataSourceTransactionManager;import org.springframework.jdbc.datasource.DriverManagerDataSource;import org.springframework.transaction.PlatformTransactionManager;import javax.sql.DataSource;@Configuration public class JdbcConfig @Value("${jdbc.driverClassName}") private String driverClassName; @Value("${jdbc.url}") private String url; @Value("${jdbc.username}") private String username; @Value("${jdbc.password}") private String password; @Bean public DataSource dataSource () DriverManagerDataSource managerDataSource = new DriverManagerDataSource(); managerDataSource.setDriverClassName(driverClassName); managerDataSource.setUrl(url); managerDataSource.setUsername(username); managerDataSource.setPassword(password); return managerDataSource; } @Bean public JdbcTemplate jdbcTemplate () JdbcTemplate jdbcTemplate = new JdbcTemplate(); jdbcTemplate.setDataSource(dataSource()); return jdbcTemplate; } @Bean public PlatformTransactionManager txManager () return new DataSourceTransactionManager(dataSource()); } }
AppConfig.java
1 2 3 4 5 6 7 8 9 10 11 12 13 14 15 16 17 18 19 20 21 22 23 24 25 26 27 28 29 30 31 32 33 34 35 36 37 38 39 40 41 42 43 44 45 46 47 48 49 50 import com.demo.spring.pojo.User;import org.springframework.beans.factory.annotation.Value;import org.springframework.context.annotation.*;import org.springframework.transaction.annotation.EnableTransactionManagement;@Configuration @ComponentScan("com.demo.spring") @EnableAspectJAutoProxy @EnableTransactionManagement @PropertySource("classpath:jdbc.properties") public class AppConfig @Bean public User user () return new User(); } @Bean(name = "user2") public User user2 () return new User(); } @Bean(name = "user3") @Scope("prototype") public User user3 () return new User(); } }
TraceLog.java
1 2 3 4 5 6 7 8 9 10 11 12 13 14 15 16 17 18 19 20 21 22 23 24 25 import com.sun.istack.internal.logging.Logger;import org.aspectj.lang.annotation.After;import org.aspectj.lang.annotation.Aspect;import org.springframework.stereotype.Component;@Component @Aspect public class TraceLog private static final Logger logger= Logger.getLogger(TraceLog.class); public TraceLog () logger.info("TraceLog" ); } @After("execution(* com.demo.spring.service.*.*(..))") public void after () logger.info("后置通知" ); } }
UserService.java
1 2 3 4 5 6 7 8 9 10 11 12 @Service public class UserService implements IUserService @Autowired private UserDao userDao; @Override @Transactional public void addUser (int id) System.out.println("===addUser=== ,id : " + id); } }
UserDao.java
1 2 3 4 5 6 7 8 9 10 11 @Repository public class UserDao implements IUserDao @Autowired private JdbcTemplate jdbcTemplate; @Override public void addUser (String name, int age) String sql = "insert into users(name,age) values(" + "'" + name + "'," + age +")" ; jdbcTemplate.execute(sql); } }
五、Spring Test 与 Junit [spring-test,junit] [请点击]
六、 Spring-Web [spring-web] [请点击]
七、 与其他框架集成 7.1 集成 Mybatis 7.1.1 基于XML的配置 7.1.2 基于Java的配置 [集成Mybatis] [请点击]
